- Access to Jira integration settings;
- Connecting Jira to EddyDesk:
- Jira error log:
- Integration examples:
In order to connect Jira to your system you need to set access for specific user groups to this module. Please open "Management" -> "Group access rights" and select the group for editing. In the "Management" tab enable "Jira integration settings" option:
After that this module will be displayed in the "Management" menu. Here you can connect Jira and read the logs of errors. To connect it, click on the "Connect Jira" button and enter the following information:
- Jira system domain;
- Login;
- Password or API token.
Please pay attention that there are some peculiarities when connecting Jira to the cloud and the server type of EddyDesk. At the moment in the cloud system you can authorize both with a password and an API token. The out-of-the-box (server) version assumes authorization by password only. In the future, we plan to leave authorization by API token only for cloud solutions, so we recommend initially using this method for authorization.
To connect Jira with a username and password, you must use the authorization data of your Jira system.
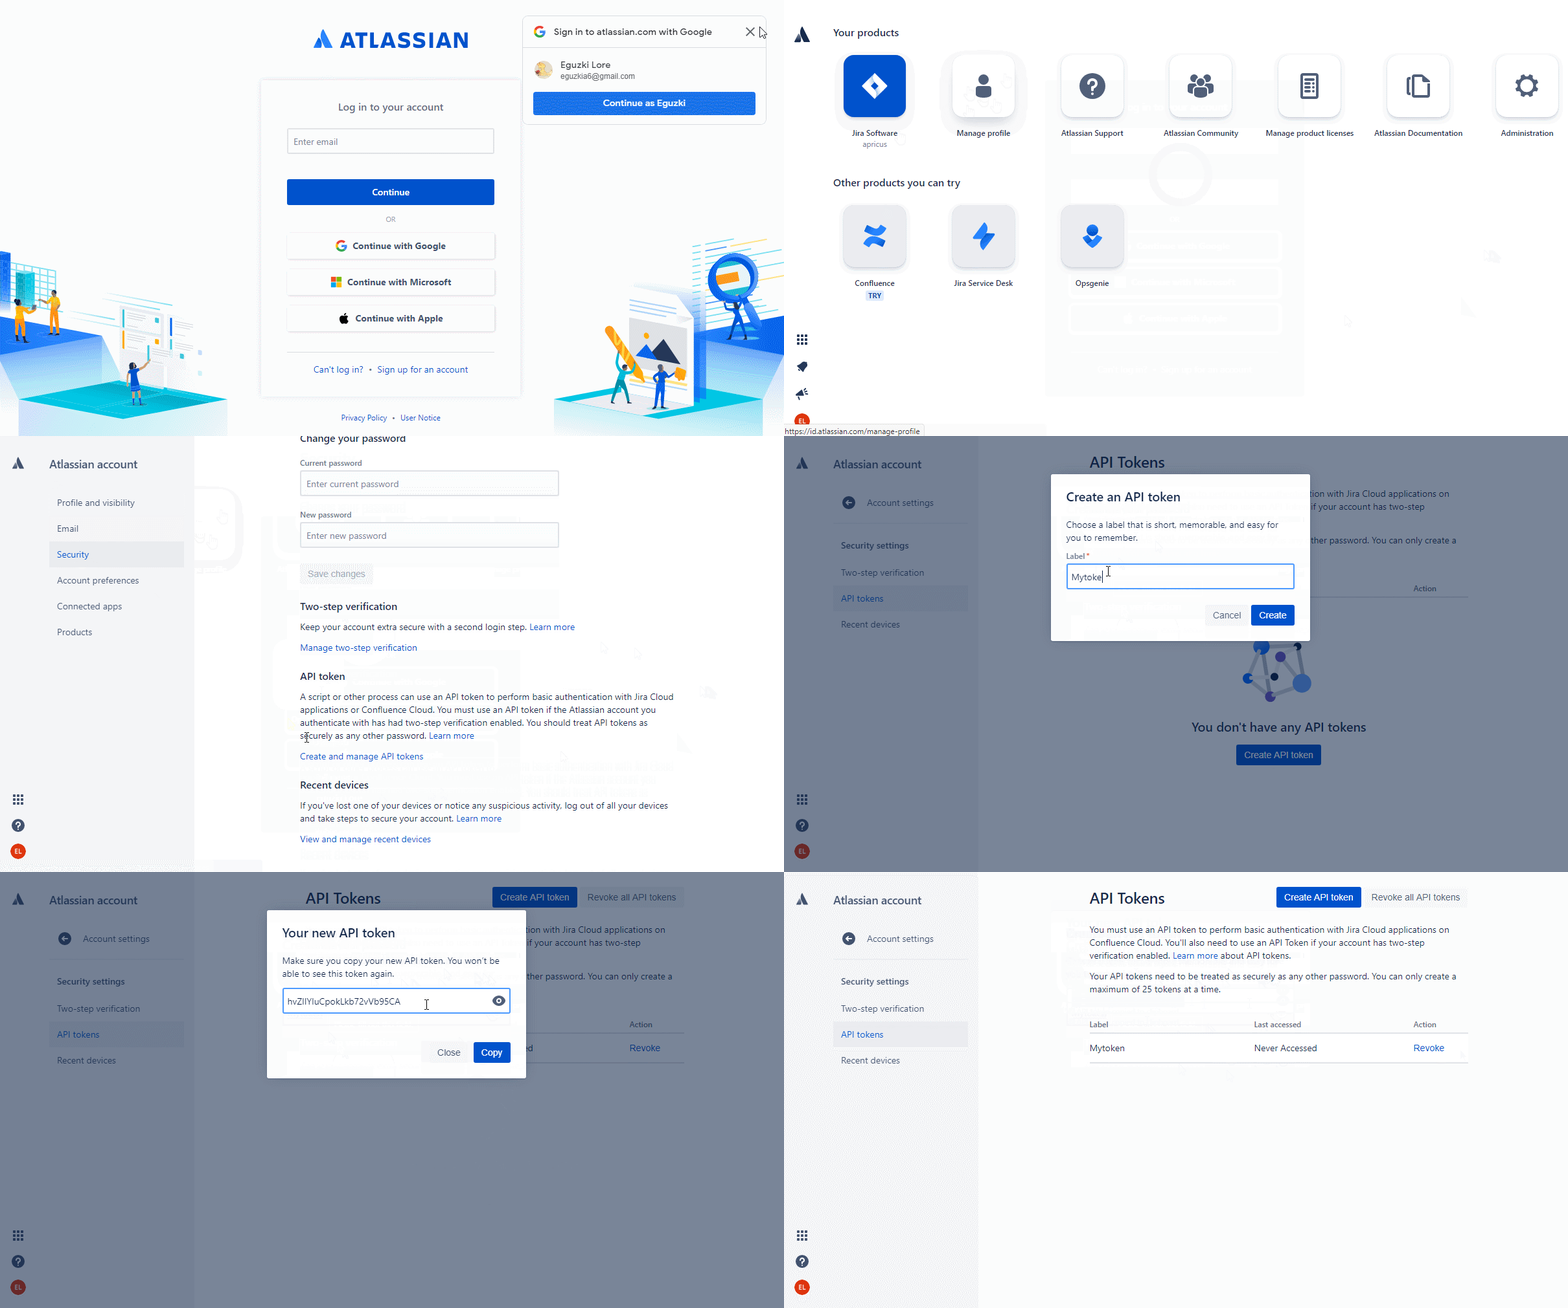
If you authorize with a login and token, you must initially generate it by authorizing with Jira portal. To do this:
- Open https://id.atlassian.com and enter your Jira system authorization information;
- Open your profile/account settings - https://id.atlassian.com/manage-profile/profile-and-visibility
- Under "Security" => API token click on "Create and manage API tokens"
- In the window that opens click on "Create API Token", enter Label and copy the Token.

Then under "Jira Integration Settings" enter the system domain (https://yourdomen.atlassian.net), login and token from Jira, and click "Check connection" button.
If the connection is successful, the message "Connection successfully established!" will be displayed, as well as a list of available functions for working with Jira projects and tickets:
Once connected, the integration will look like this:
"Jira error log" includes all information on any connection errors or integration operation errors.
| "Domain already in use" error |
Can occur when you do not have Jira administrator rights or when you cannot create/edit a webhook in Jira. Your system needs to receive callbacks with information for the integration to work, so in addition to user authorization, the system sends a number of requests to set up messaging between the systems. Check the user rights, the user must have access to the Jira system settings (usually just change the rights to administrator) and must have access to configure webhooks. |
When working with Jira, there are several peculiarities that should be taken into account:
- When you create a project or task in Jira on behalf of a user that is integrated with EddyDesk, the data will be ignored and won't be integrated with EddyDesk. Therefore, we recommend to use an additional user profile in Jira for testing and working with integration (not used for integration between systems).
- Jira Typing. If you do not have at least one access to a project type in the integration settings, it is not possible to create a ticket in Jira. Therefore, access to at least one of the project Types is required.
Receiving tickets from Jira:
Creating a new task in a project on Jira side:
Displaying this task in EddyDesk:
When you add replies and make changes to existing Jira tasks, this data will also be synchronized with EddyDesk.
Example of adding a reply and changing an assignee on Jira side:
Example of displaying this reply and changes on EddyDesk side:
Creating tickets in Jira:
To create a task in Jira, you need to click on an internal note in an existing request, select Jira, be sure to specify the type and project in which the task will be added. You can select several projects at once and create several tasks at once. Example:
After adding an internal note, the request will display the projects and tasks to which this information has been added:
These links will take you to the project and the specific task in Jira:
When you go to a specific Jira task, you can see the internal note that was sent, as well as the metadata on the request:
When you repeatedly submit information to Jira within a request, you can both add an internal note to already created tasks and create new ones. This information is displayed when you select the Jira item in the internal note.